

Toyota Key Fob Battery Maintaining your keyless entry system functionality is vital for daily convenience. Over time, the milliampere-hour (mAh) capacity of your remote diminishes, leading to poor signal range performance and frustrating delays when unlocking your vehicle.
A proactive approach involves understanding DIY battery replacement steps before your remote fails completely. Learning this process provides Toyota dealership alternatives that save you time and money while ensuring your smart key remains reliable.
Table of Contents
Also Visit How to Change Toyota Key Fob Battery
Key Takeaways – Fast Summary Before You Start
Replacing your power cell is the ultimate cost-effective, reliable solutions for remote issues. Before starting, confirm you have the correct CR2025 and CR2032 coin cell batteries to ensure your truck recognizes the signal.
How to Change Toyota Key Fob Battery with Optional Helpful Tools
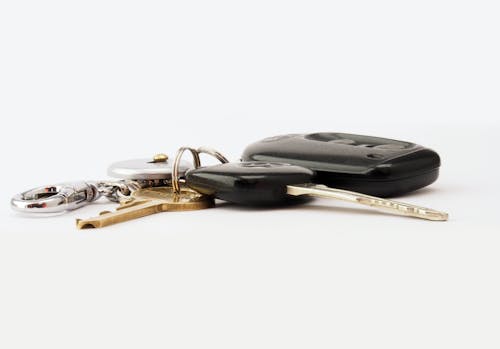
To successfully restore your keyless entry system functionality, start by removing the mechanical key hidden within the casing. This initial step provides the necessary emergency physical key access point to begin prying the two halves apart.
Using a specialized prying tool or a small flat-head can simplify the key fob disassembly without scratching the plastic. These DIY battery replacement steps are straightforward and serve as excellent Toyota dealership alternatives for owners.
Next, carefully lift the old power cell out of its cradle, noting the positive terminal orientation before removal. You will typically find that CR2025 and CR2032 coin cell batteries are the standard power sources required.
Step-by-Step Guide to Replacing the Battery
Toyota Tacoma – How to Change Toyota Key Fob Battery – 5 Simple Steps for a Quick Fix
- Maintaining your keyless entry system functionality is essential for daily convenience.
- When your remote starts failing, a DIY battery replacement steps approach is the most cost-effective way to restore your signal range performance quickly.
- Choosing Toyota dealership alternatives saves time and money for every truck owner.
- You can easily handle this remote transmitter maintenance at home by following a few clear instructions to ensure your smart key remains reliable.
Prepare Your Tools and 3-Volt Lithium Power Source
- Before starting, identify if your specific model requires CR2025 and CR2032 coin cell batteries for power.
- Having a small Phillips head screwdriver nearby will help if your particular casing year utilizes a tiny retaining screw.
- Check the milliampere-hour (mAh) capacity of your new cells to ensure long-lasting life.
- High-quality batteries prevent frequent issues with your keyless entry system functionality and keep the signal strong for years of heavy daily usage.
Emergency Physical Key Access and Key Fob Disassembly
- Begin the key fob disassembly by sliding the release button to remove the metal blade.
- This emergency physical key access is necessary to reach the hidden slot used for prying the two plastic halves apart.
- Insert the key tip or a flat tool into the designated notch to open the casing.
- Be gentle during this stage of remote transmitter maintenance to avoid cracking the plastic or damaging the internal circuit board.

Removing the Old Battery and Checking Positive Terminal Orientation
- Once open, carefully lift the old 3-volt lithium power source out of its housing.
- Notice the positive terminal orientation before removal, as inserting the new one upside down will prevent the transmitter from functioning correctly.
- If the battery is stuck, use your Phillips head screwdriver to lightly nudge it.
- Clean any dust inside the housing to maintain peak signal range performance and ensure the metal contact points remain shiny and conductive.
Installing the New CR2025 and CR2032 Coin Cell Batteries
- Place the fresh cell into the slot while strictly following the correct positive terminal orientation.
- Ensuring a snug fit is vital for consistent keyless entry system functionality and avoiding annoying intermittent power connection issues later.
- Press down firmly until the battery clicks into the holder’s plastic tabs.
- This simple DIY battery replacement steps process ensures your remote transmitter maintenance is successful without needing any specialized or expensive professional mechanical tools.

Reassembling the Housing and Testing Signal Range Performance
- Snap the two halves of the casing back together until they lock securely.
- Reinsert the metal blade used for emergency physical key access to complete the key fob disassembly and restoration of your Toyota remote.
- Finally, test the buttons near your vehicle to verify the improved signal range performance.
- Your DIY battery replacement steps are now complete, providing a reliable 3-volt lithium power source for your Tacoma’s advanced security system.
Common Mistakes to Avoid
One frequent error during key fob disassembly is using excessive force or the wrong tools, which can crack the delicate plastic casing. Many owners forget that a standard Phillips head screwdriver isn’t always the best fit for prying, potentially damaging the internal seal. Additionally, choosing batteries with the wrong milliampere-hour (mAh) capacity can lead to shorter lifespans. Always verify the battery code before installation to avoid frequent trips to Toyota dealership alternatives for professional repairs or expensive part replacements.

Another critical mistake involves touching the electronic components with oily fingers or installing the battery upside down, which halts the transmitter. Incorrect orientation prevents the circuit from closing, making the fob appear broken when it simply needs a flip. Ensure the contact points are clean and the battery sits snugly in its housing before sealing. Proper care during this quick fix prevents long-term damage to the smart key system. Check the internal components twice to ensure everything is perfectly aligned.
Troubleshooting – If Your Toyota Key Fob Battery Still Doesn’t Work
Battery Installed Backwards
Correcting the Polarity Alignment
Installing a 3-volt lithium power source upside down is a common mistake during DIY battery replacement steps. This error prevents the circuit from completing, which immediately halts all keyless entry system functionality for your vehicle.
Open the casing and verify that the positive terminal orientation matches the markings inside the plastic remote housing. Most Tacoma fobs require the plus sign (+) to face upward toward the back cover of the device.
Damaged Internal Contacts
Repairing the Metal Connections
Physical wear can damage the delicate metal tabs responsible for drawing power from the 3-volt lithium power source. If these contacts are flattened or bent, your keyless entry system functionality will become intermittent or fail.
Carefully use a small tool to lift the tabs back into their original position for better remote transmitter maintenance. Ensuring a tight grip on the battery prevents loose connections that negatively impact your signal range performance.
Toyota Key Fob Battery Needs Reprogramming

Sometimes, replacing the CR2025 and CR2032 coin cell batteries causes the remote to lose its sync with the vehicle. This synchronization gap disrupts the keyless entry system functionality, leaving your buttons unresponsive despite having fresh power.
To fix this, enter the cabin and use the emergency physical key access to turn the ignition on. This process often re-establishes the link between the vehicle computer and the remote transmitter maintenance system without tools.
When to Visit a Professional
If you have replaced the 3-volt lithium power source and checked the contacts but the remote remains dead, the issue is likely internal. A professional can diagnose if the circuit board suffered water damage or a micro-soldering crack.
Seeking help is one of the best Toyota dealership alternatives when the keyless entry system functionality requires specialized diagnostic tools. Experts can test the frequency output to ensure the remote transmitter maintenance isn’t compromised by hardware failure.
Final Thoughts – Keep Toyota Key Fob Battery Working Like New
Regularly checking your signal range performance can alert you to a dying battery before you get stranded outside. Keeping a spare 3-volt lithium power source in your glovebox is a smart move for every driver.
By following these DIY battery replacement steps, you maintain keyless entry system functionality without paying high prices. Consistent care ensures your Tacoma remains ready for any adventure with a reliable and very strong remote.
What battery does a Toyota key fob use?
Toyota vehicles are equipped with the CR2032 3V lithium coin cell battery, which is an excellent and long-lasting battery.
How long do CR2025 batteries last in a key fob?
If you want to install batteries in Toyota vehicles, then choose CR2032, which is an excellent and long-lasting battery, while CR2025 is installed in a small space and low drain item.
How long do Toyota key fob batteries last?
A Toyota car key battery lasts for two to five years, depending on how much you use the car remote.
What does CR stand for on a battery?
CR Standards for Lithium Batteries.
How much does a dealership charge for replacement?
If you have a mechanic change the battery cell of your car, they will charge you between $25 and $75 for the work, including the battery replacement.


